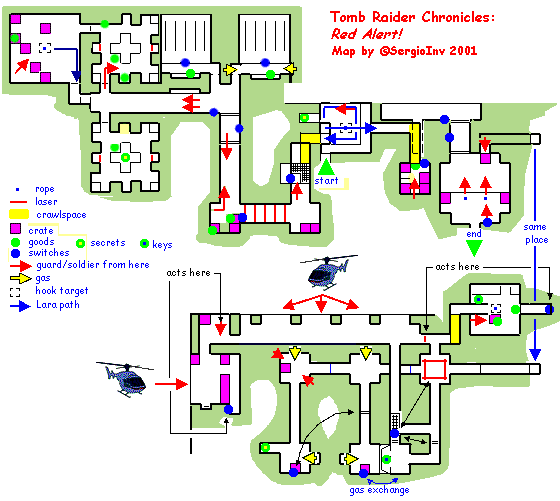
Red Alert!
First version: Jan 2001, revised Feb 2002
Shortcuts: VB = vault bar, HB = horizontal bar, RJ = running jump, SJ =
simple jump, RJA = running jump with action, SJA = simple jump with action,
SMP = small medipack, LMP = large medipack, SES = soldier.
- Special tips emphatized red.
- Very special tips (added Feb 2002) to get Red Alert! with 0
medipacks and 3 secrets emphatized
blue (thus the whole Chronicles can be played with 0
medipacks and 36 secrets). To play without medi you have to stop
guards and soldiers before they start firing, so use single-shoot mode
hitting the face.
A soldier is killed by 1 single shoots at his face in the "single shoot" mode.
A guard is killed by at most 8 HK shoots, but often you can use 1 single shoot.
The HK "intermediate mode" gives series of 5 shoots (or less
releasing the key)
Use the HK "fast mode" for the cyborg only.

1. "Tower pit" / don't move / get HK / kill SES with 1
single shoot at his face / up / right / RJA / right / up / right / 4
(walking) steps and SJ over collapsable stairs / hopback action climb down
and left for Secret #1 out of 3 / jump to collapsed stairs and climb
up / right / up few steps and SJ to corner / right / RJA / right / 4
(walking) steps and SJ over collapsable stairs / no return / ledge
with "cold flame" [no danger] / kick the bricks to open a crawlspace /
crawl in / pan camera room.
2. Standing jump action to open a trapdoor on the upper
grate / kill BB coming from upper floor (8 shoots needed, or a single shoot at face) / climb up / 5
laser beams to cross: get the correct time / use the laser viewer or use 1
single shoot to break the red valve to releasing steam [to make laser
visible] / small room after 5 lasers: get hook #1 on lower crate and 1 LMP
on higher crate / kill BB coming from the elevator / to kill him with 1 single shoot, take into account that
he's coming from the center of the left square (the elevator width is 2
squares) / up / ready for the difficult Secret #2.
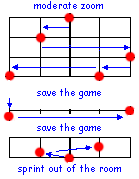
3. Enter Target Practice Room #1 / 5 simultaneous targets:
| LL (far left) |
| | | RR (far
right) |
| | L (left) |
| R (right) | |
| | | C
(center) | | |
hold HK single shoot mode / save the
game at the switch / action to switch / get the
HK and use a moderate zoom / shoot all the targets as quickly as you
can (before one of them crosses some deadline) / now you can
access Target Practice Room #2 nearby / have a
saved game before entering the Target Practice Room #2: either you will get
the very difficult secret or you will die in that room.
4. Enter Target Practice Room #2, no return now (door
is closed) / 10 targets come in order: C, L, RR, R+LL, LL+RR, C+L+R /
you have to hit all of them before one crosses some deadline (or you are
dead).
 Up to now, I considered the Three Doors timed run in Aldwich (Tomb Raider III)
the more difficult step in Lara's adventures, but this one is even more
difficult: I needed a total of 3 hours in 2 different days (after some
nervous beakdown the first day) to come out. Here's what I did:
- Save the game in front of the switch on a
new file (not where you saved before: in the unsuccessful case, you shall
be able to continue the giving up this secret / action to
switch / take the HK with a moderate zoom.
- Shoot (single mode) the first 5 targets: C, L, RR, R+LL, and
immediately save the game on a new file. The first 3 are easy, the last 2
are simultaneous and very less easy to hit.
- Shoot (single mode) the extremes LL+RR (this is very hard) and save the
game on a new file.
- With a moderate zoom shoot (single mode) the
triple C + L + R in this order. Ouf, ouf, ouf!!!
What happens if:
- you fail just one shoot: the targets stops and Lara is poisoned by some
gas coming from side grates, door closed, no hope of surviving... reload.
- you hit all the targets (in the time allowed): the exit door opens and
the gas is still released, and Lara appears to be
poisoned [yellow bar]... but the air bar [blue bar] comes on and this
means that she holds back her breathing / sprint out far away until the
bars disappear.
4. At the hallway end, the left room is now available /
caution: laser / get Secret #2 out of 3 and some ammo from the floor
/ save the game / enter right symmetric room / caution: laser / get the
ammo on the floor / hold HK single shoot mode / get the Hook Launcher at
the green lights / roll and kill BB coming from the hallway (1 shoot at
face is enough) / get hook #2 on a "table" near the door / now a quite long
trip to come back to the elevator.
5. Enter next large room / kill BB coming from crates
at left: run, back to left wall, to come closer
to him: 8 shoots needed: he wears a bullet-proof jacket / or
climb the blocks and jump down in the hidden
corner behind the crates: wait and use a single shoot /
select the Hook Launcher and hit the center of the ceiling / get rope / use
the rope to jump on the wall with spots and (invisible) crevice) / action
to crevice / shimmy right / climb tunnel / save the game.
6. Run out (forward) and slide down in the hallway you
know / 2 SES come from the hallway, firing with blue laser pistols / don't fire! use Lao-Tzu Principle: "The best winner
never gives battle", and sprint to the elevator, press the button and leave
them to their destiny. / lower floor: BB coming from crates
(where the first hook was): walk back to right wall just before the corner
where he's hidden, hop forward and back to move him, get the HK and hit him
with 1 single shoot at his head / save the game and pass the 5 lasers as
before / drop into pan camera room / crawlspace to the "cold flame" ledge /
select Hook Launcher and hit the broken metal ladder over you / get the
rope (SJA from the center edge of the sloper plate) and save the game.
7. Jump to the tunnel with broken grate and (hot) fire
inside / no return / bounce while sliding to overcome the fire /
grab next ledge and pull up / save the game / enter crawlspace (no
obstacle) / BB to be killed before he starts the alarm (and a gun machine
on the ceiling) / append to crawlspace / drop down, roll and simultaneously
get the HK / view mode and zoom to hit his head
with 1 single shoot / this works if he's away from the alarm,
otherwise (he's walking, and he can be everywhere when you drop down)
reload and redo / you loose some 10% energy
when dropping down.
8. Get 1 LMP / save the game / absolutely nothing on
the crates / switch to exit / window hallway, nothing, but stop a moment to
see the beautiful view of the Towers and remember the Victims and the
Heroes of September 11, 2001 / switch to get the elevator / switch to go up
(I suppose) / doors open to a large room (it's the final room of the level
with a VCI-shaped lock near a door waiting for a key) / save the game /
entering the room 2 BB drop from ropes from the ceiling / sprint to the
right plant to take shelter / use HK in the intermediate mode (I wasn't
able with single shoots) to kill both BB / otherwise sprint/jump to the VCI lock, roll and fire
twice / RJ from the left plant box to rope to grab it, or RJA
from the VCI lock ledge (Gaby)/ jump on high crate (the crowling corner bug works here)/
standing jump action to open grate / roll, back to wall to kill BB coming
from nothing / or, on the top, turn back to the
wall, standing jump action to open grate (front to the room), take HK while
going down and fire in the intermediate mode / another BB in
the vent: use 8 single shoots firing from the far
right of the crate (cannot use Lao-Tzu Principle because in the sequel he's
able to shoot Lara though the grated floor) / collapsable
trapdoor / slide down / square room with 2 sided stopped by laser (they
will be switched to other sides now free) / right / caution: look at your
left the "windowed" hallway with gas cylinders: it's laser protected but
the most important thing is don't shoot the gas
cylinders! / crawlspace at right / enter few steps and save the
game in the tunnel leading to a room with hidden (and very hard to die) BB
(cyborg #1).
9. You have to kill the BB in the room since he has
The First Half of the Exit Key. It's a quite difficult (and somewhat strange)
room.
- Save the game in the tunnel / check your health / switch HK in rapid
mode and get it / look out right down to locate a crate with ammo / run out
in diagonal (right down) to land on the crate / BB starts firing / use zoom
to shoot a water valve, just 1 shoot / then shoot the BB until he reveals
that it's a cyborg and "dies": I used some 50 shoots. Or: stay exactly at the center of the crate, rotate
until the auto-aiming HK is ready to hit the walking around BB, fire few
shoots (say 5), hopback into water before BB starts firing, climb
immediately up the crate, save the game and repeat as many times as
necessary to kill him (last time don't leave the crate
since...)
- The floor is flooded and electrified so you cannot go down / align Lara
on yje crate to the sloped ledge in the far corner, RJ holding jump key / 3
more jumps / land safe on the higher ledge.
- Get the hook #3 on the grate [in a dark place! wasn't difficult
enough?] / select Hook Launcher and fire the hook on the ceiling / get the
rope with SJ starting 2 walking steps far from the edge / use the rope to
enter the opposite tunnel.
- switch the switch a first time to eliminate the water on the floor (but
this closes the grate of the entrance/exit tunnel) / RJA to get the rope /
jump to highest ledge, and get the safe dry floor, get the ammo on the
crate, 1 LMP on the floor and The First Half of the Exit Key near the
"died" cyborg.
- again into the tunnel using the same rope / pull the switch a second time: this
turns off lasers at the entrance of the windowed hallway with gas
cylinders, and opens the grate of the entrance/exit tunnel.
- again RJA to the rope / again jump to
highest ledge, and get the safe crate (not the floor!), JA to the
entrance/exit tunnel.
Strange things happen in this room:
- on the safe crate: if you get out of ammo, you can reload the ammo
on the crate as many times as you need to finish your job.
- with the cyborg died, if you go back to the tunnel before the
square room with lasers, the water turns off: in this case switch twice
the switch.
- after the 2nd switch of the switch, you can found a totally useless
hook #4 in the same place where you got the #3.
Go back to the windowed hallway with gas cylinders / save the game /
explore the hallway at left: it will be Lara's final challenge in Red
Alert! / reload last saved game.
10. Now you need to get the opposite side of the
windowed hallway with gas cylinders under the helicopter fire / to run out
the hallway: don't sprint but just run holding
the jump key (as you probably did in Tomb Raider I), start with
a jump, and slaloming the gas cylinders: this will bring you exactly behind
the last column in a safe position [behind you the gas cylinders may
explode or not: anyway, you will find all of them exploded when you will
come back here] / 1 LMP in the lower floor, give it up! / 1 LMP in a
crowlspace of the lower floor, give it up! / sprint into the corner room /
save the game.
11. To enter the cafeteria, use HK viewer to align Lara to the passage between the
tables at left (pan camera will disturb you) / run under the
helicopter fire / crawl while behind table, safe / crawl ahead to a switch,
switch it / it releases the Guardian of The Level (cyborg #2) in the corner
room / Zip is talking you "... run! ... run!" / save the game / run out
of the cafeteria back to the corner room where the cyborg #2 starts
shooting you / of course the helicopter is still outside... / save the
game in this corner room with the cyborg #2 nearby / or, starting in crowling position behind the table, run
out of the cafeteria back to the corner room where the cyborg #2 is and run
run run (see next #12)
12. The final trick is kill the cyborg #2 by gas / do
the following: run in the windowed hallway and jump the pits (in a running
jump mode recalling for example The Course for The Iris in The
Last Revelation, but here you have the helicopter firing) / cyborg #2
follows you closely / turn right just before the end to sprint into the
tunnel (helicopter? safe!) / U-turn left in a "room with glass wall", and
turn left into the small room "under the grate" / when the cyborg #2 runs
over you (on the grate) switch to close the 2 doors and transforming the
room with the glass wall into a blind-room with the cyborg #2 inside / you
don't know yet, but the same switch switches the lasers from 2 sides of the
square room to the other 2 sides / relax and save the game.
13. Enter the square room with switched lasers / the
now accessible door (automatic) allows Lara to enter 4 small gas-rooms
filled by gas / sprint into gas-room #1 / continue straight away sprinting
to gas-room #2 / turn left / sprint into gas-room #3 / a crawlspace on the
right has pure air (thanks to Programmers) and hides the Secret #3
out of 3 which is also Secret #36 out of 36 / the switch in gas-room #3
opens the connection from #1 and #4 / switch it [you will need free access
to gas-room #4 in few minutes] / roll and sprint back to square laser room
/ 2 BB (with gas masks) appear in room #2: you can ignore them or waste
some ammo (if any).
14. From the laser square room, get the gas-room #4 /
switch to exchange the gas between the room you are and the near blind-room
/ wait for the end of the cyborg #2 / he leaves on the table the Second
Part of The Key / switch again to exchange gas and sprint out to the laser
room / to the small room under the grate to de-blind the room [switch one
more] / get the The Second Half of the Exit Key in the de-gassified room with glass wall (wher
the cyborg #2 was) / save the game.
15. To the windowed hallway (say "Hi" to guys on the
helicopter) / sprint right and enter for the last time in this game the
square laser room / left, back to the large room (with 2 ropes) / use the ladder
to climb up: we are lucky that some switch (I don't know which) made open
the trapdoor at its end / drop to the high crate / Zip talks few nonsense /
get the lock / save the game.
16. Combine the key and use it / congratulations / exit / end level.
Thanks, Lara.
After the credits, a preview of Next Generation is available. Thank you
for visiting. See you on November-December 2002.
Sergioinv
Last modified Mercoledì, 20 febbraio 2002 21:59
 Up to now, I considered the Three Doors timed run in Aldwich (Tomb Raider III)
the more difficult step in Lara's adventures, but this one is even more
difficult: I needed a total of 3 hours in 2 different days (after some
nervous beakdown the first day) to come out. Here's what I did:
